If you are inspired by letters and want to get started with calligraphy but aren’t sure about what supplies you really need, this article is for you. What we’re really trying to improve with calligraphy practice sessions is steadiness of hand and consistency in our letters.
Learning calligraphy doesn’t depend which pen you’re using or what ink you dip into. It takes dedicated practice to make sure straight lines are straight and curved and circular shapes are the same volume and shape. It sounds tedious, and it is, but this is the practice. Whether you’re cultivating a clean, traditional script or something modern and carefree, the quality of your lines makes your work peaceful and satisfying to view. Starting with basic calligraphy materials will help you to develop that.

5 Sections in this Calligraphy Practice Supply Article:
Be sure to take breaks from practice every 30 minutes or so.
I get most of my calligraphy supplies at my local art stores, Arizona Art Supply and Sarnoff Art & Framing here in Tucson. If they don’t have what I need, I turn to Paper & Ink Arts or John Neal Bookseller.
Paper
The sheer amount of papers to choose from can be intimidating. If the paper doesn’t interact with your pen, the results can be discouraging. You can start with copy paper, lined paper, or graph paper and a pencil to work on your lines and your pen grip. Then, decide what paper you want to deepen your calligraphy practice with.
I like working on these three: Bienfang Marker Paper, Strathmore Layout Bond Paper, and Rhodia Blank Paper. Each pad comes in various sizes. I recommend 9″×12″. Each of these pads are smooth, lightweight, and can take a good amount of ink. You can see guidelines through them if you place the guidesheet under them.

Check out my article, Tips for Guidelines for more about the benefits of using them. You can also download and print Guidesheets for Copperplate and Spencerian Script.
Pencils, Markers, or Nibs for Calligraphy Practice
Pencils
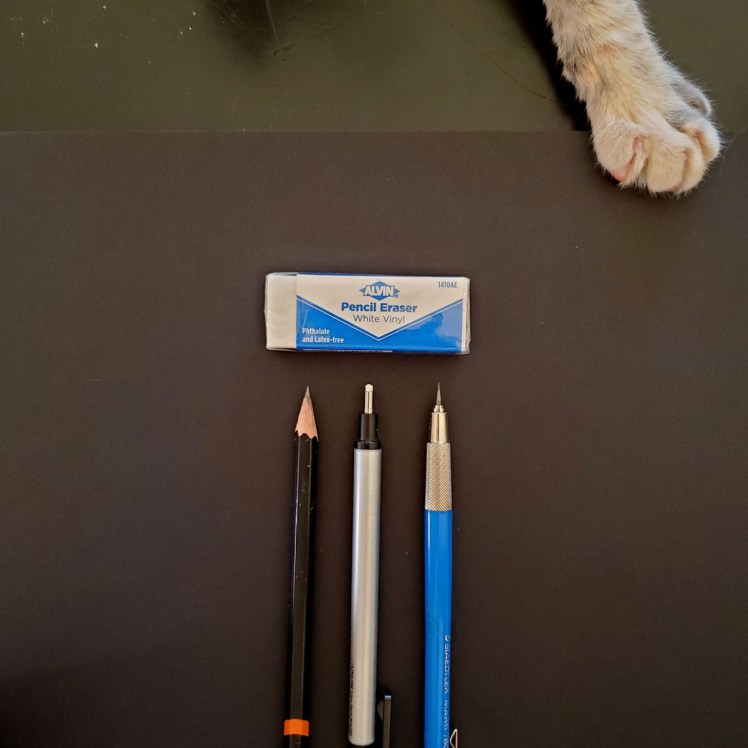
It sounds elementary and you don’t see many impressive videos of it online, pencils are a wonderful way to develop your calligraphy practice. They take the ink component out of writing and allow you to focus on lightening your pen grip. Having an excessively firm pen grip causes pain and eliminates hand and arm mobility. Pencils also make it easier to practice whole arm movement, breathing while writing, pressure control, form of strokes, and flourishing. A sharpened hard lead pencil like a 2H (pictured left) is ideal for practice. I generally use a mechanical pencil (right) to draw guidelines on final pieces.

I keep two beloved erasers within reach. The white plastic eraser pictured above is for erasing guidelines after a final piece dries. The small Mono eraser (center in photo) for specific erasing. Do not erase mistakes on your calligraphy practice. You are meant to study and learn from them.
Calligraphy Nibs
Calligraphy Makers and Nibs

Broad Edge Calligraphy Markers
The first calligraphy pen I ever used was a black chisel felt tip pen provided in the class. I was 11, and so was everyone else. Fortunately for me, felt tip calligraphy pens became kind of a staple gift to receive. These types of markers are wonderful for beginners because you can still work with ink, but you don’t have have to worry about regulating ink flow like you would with a dip pen. Once you have lightened your touch, it’s time to learn pen manipulation and control to make more delicate, shapely and complicated strokes.
Steel Nibs
The most important thing to look at every time you sit down to write is your nib: check it for cleanliness and damage. Dried ink or paint, stray hairs and other particles on the nib prevent the flow of the ink and the proper function of the nib. The last thing you want in your strokes when you’re trying to work carefully and thoughtfully is an errant fiber that drags ink everywhere. Trust me.
A Note on New Nibs
Since they are made of metal and are fragile, manufacturers put a thin protective coating on each nib. This prevents rust, but it also means ink will not adhere to or flow from this coating. Remove the coating before you write with the nib by gently washing the nib with soap and water. Saliva works well for this too. Some calligraphers poke the nib into a potato for the starches to break the coating down. This approach is just too abrasive to me and I’m convinced it would damage the nib. Plus you could still eat the potato. Check out How to Start a New Calligraphy Nib for more information!
Whatever you do, don’t pass the nib through a flame to get rid of the coating!! Heat will soften the metal, making it more fragile and susceptible to damage and disappointing letters.
Ink

The first ink I worked with was Higgins, straight out of the bottle. I later switched to sumi ink because it was a favorite among my Instagram calligraphy idols. I like bottled inks for calligraphy practice and for beginning. Always test the way your paper, ink, and nib interact before starting. Use an eyedropper to slowly dilute your ink if it’s too thick.
Decant ink into a smaller container. Chiefly, if you spill it, you make a smaller mess! Plus, you can’t pick up too much ink on your nib if there isn’t much there to begin with. Tip: make a tape roll and stick the bottom of your ink container to the desk. The furthest a nib needs to be dipped is just enough to submerge the reservoir.
Exemplar
An exemplar is a model of the script you are working with. It shows what the letters look like, what guidelines you need, and where on the guidelines to make the shapes. Exemplars sometimes have notes about the pen angle and the slant of the script. You can find exemplars online and in calligraphy books. Keep your exemplar someplace you can easily see it as you’re working. Study it, refer to it as you write, and use it to check your practice against.
Environment
Keep your work area neat and clean. Writing calligraphy is tedious and time consuming. Don’t make your work harder on yourself because you can’t find a tool you need. Protect your work from being ruined by errant dust or by papers blowing around on a windy day. Trust me, I know from experience!
Use good lighting. It’s important to be able to see details like guidelines, your exemplar, and your writing instrument as you work. Having good lighting adds to your comfort, to the consistency of your letters, and to the integrity of your script.
Sit in a chair with your feet flat on the floor. Posture and stability in the body play a massive role in your success. If you’re uncomfortable or if you are straining to see, you’ll be less successful in your writing and less likely to want to continue to even practice. Sit upright with a natural curve to your spine, hips steady and feet on something steady. This type of stability in the lower part of the body offers freedom and movement to the upper body, as well as room for the lungs to breathe while you’re writing. This truly brings your script to life.
Other Helpful Tools for Calligraphy Practice

Ruler, L-Shaped Ruler, and Protractor
I use a ruler to rule guidelines and measure layout. It also serves as a straight edge for cutting paper with a craft knife. The L-shaped ruler is for making sure edges and lines are perpendicular to each other. The protractor is useful for measuring the pen angle and slant lines.
Small Paperclips
Use these to hold a small stack of papers together to keep them from sliding as you are practicing. Put a couple blank pages under your guidelines as a cushion, then put a fresh practice sheet on top of the guidesheet. Clip all 4 pages together at the top edge with 2 paperclips.


Masking Tape
Masking tape is something I use all the time. It’s so helpful and handy. I’ll tape final pages on top of guidelines sometimes, depending on the project. I also use it to play with layout or even to tape a protective sheet over guidelines I’ve ruled so I don’t smear them as I am writing calligraphy further up the page.
Skills, Not Tools
I wrote this post about basic calligraphy materials make it easier for you to begin practicing writing calligraphy. It’s easy to get caught up in the fancier supplies available, but the skill is truly in the abilities you’ll learn and practice. Starting small and simple removes some of the pressure of being perfect. This lets you settle more deeply into your writing and lets you adjust your natural habits.
Check out Beginning to Write and Practice to put your tools to good use. Any questions? Leave a comment or send me an email! If you’ve made it this far in the post, you get to see the bonus outtakes of my kitten touching all my supplies as I was taking pictures. Normally, she’s not allowed on the desk. I had a weak moment.


7 thoughts on “Calligraphy Practice Supplies”
Comments are closed.